Being able to stream internet radio stations from all over the world is a great opportunity for language learners. Living in a country full of native speakers is the ideal environment for listening practice, but not everyone has the chance to travel or to spend significant time in the target country. For the rest of us, listening to live radio online gives us a touch of authentic culture, whether it’s a call-in show, traditional or pop music, or even commercial ads. In addition to streaming radio, podcasts are another way to listen to native speakers. As podcasts are individual files that can be downloaded, they make suitable material for listening practice, with the ability to repeat or slow down sections that are unclear. But podcasts in Chinese are few in number. Being able to record streaming radio would give the learner a wealth of practice material with massive variety. Or it can just record hours of music for your listening pleasure.
I have generally had good luck recording streams using the VLC media player. VLC is a free and open source media player, available for Windows, Mac, Linux, and BSD. It can play a wide variety of video and audio formats, including DVDs and VCDs, network streams, and capture devices (such as some TV tuners). I use it myself as a media player, along with Media Player Classic, WIndows Media Player, Winamp, etc., depending on the file type. In addition to playing media, it can broadcast what it plays using a number of streaming protocols, and it can also save to a file what is being played, and can transcode if the format differs from the input source.
Step 1: Find a stream URL
Many Chinese broadcast streams seem to be here today and gone tomorrow, or are inaccessible or just dead air. Finding a reliable one may take some trial and error. Here are some sources of listings to get you started.
- Wikipedia – List of Chinese language radio stations
- worldtvradio
- Baidu
- Reciva Radio Portal
- multilingualbooks.com
What you need is the actual stream URL, which will usually start with mms:// or rtsp://, rather than http. Some stream listing sites play the stream directly through an embedding web player, making it hard to find the actual URL. Sometimes it can be obtained from the HTML source code, but even there itcan be overly obfuscated. In some of these situations, a packet sniffer like Wireshark can dig out the actual URL without too much sweat. Increasingly, it seems more sites are adopting encrypted streams with an embedded media player using Microsoft’s SilverLight; these are probably inaccessible outside of the embedded player.
Step 2: Setting up VLC
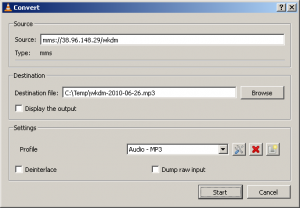
Here are the basic steps:
- Start up VLC
- Select menu item Media -> Open Network Stream
- Paste the URL in the address field
- Click the small menu button next to the “Play” button
- Choose Convert
- (alternate to steps a-e) If the stream is already playing, you can get to this same dialog box by selecting menu item View->Playlist, right-clicking the currently playing item, and choosing “Save”
- Name the output file in the Destination field. It’s best to get the file extension (.mp3, .wma, .m4a, .ogg) to match the encoding
- Select “Display the output” so you can hear it while it’s recording
- Choose an audio profile for the output format (See below)
- Click “Start”
If all goes well, there will be a few seconds of buffering, and then the stream will play. At the same time, the output file will be created, and the file size should slowly increase. If all doesn’t go well, you could see an error message stating that the stream could not be accessed. In that case, the stream could be down either temporarily or permanently.
Audio Profiles
The four most common formats for saved audio files are MP3, WMA, AAC (m4a), and OGG Vorbis. Which one you choose depends on what kind of device or software you want to play it on. The MP3 format will work on almost any device, while WMA and AAC are formats commonly used by Microsoft and Apple, respectively. Ogg Vorbis is a free and open format, and is commonly found on Linux operating systems.
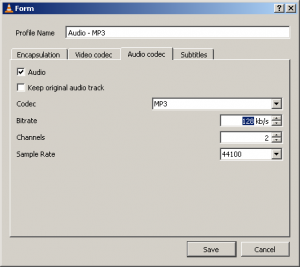
WMA is not set up as a preset upon installation, but it can be created easily. Click the icon for “Create a new profile,” choose encapsulation of “ASF/WMV”, and audio codec of WMA2.
After selecting a profile, click on the wrench icon to show the settings for that profile, and then select the third tab, “Audio codec”. Audio broadcasts are commonly streamed at a low bit rate, most commonly 64kbps. If you save at too high bit rate, you will be making the file size larger without gaining any extra quality. The best option is to set the bit rate around the same as or a little higher than the source (which you can get from the menu option Tools -> Codec Information). If the resulting file sounds worse than the original, then adjust the bit rate upwards. As I understand it, changing the number of channels from 2 to 1 (from stereo to mono) should also boost the quality, as the expressed bit rate is the total bit rate for all channels. If you are recording music, stick with 2 channels, but if the broadcast is just speaking, there isn’t much to gain by hearing it in stereo.
Enjoy your listening content!
With your hours upon hours of recorded broadcasts, there are many things you can do. On occasion, I like to use my cassette adapter in the car to play from my music player, and I can pretend I’ve tuned in to a Chinese radio station. I also have had success using Audacity to split up a long single track into more manageable pieces, whether it’s individual music files or a series of callers to a call-in show. In future articles I hope to describe some of these techniques in more detail.


